Part III - THE SOFTWARE
- Briefly the main steps to be followed are:
- Install OpenWrt
- Configure the network settings
- Extend the router memory by configuring an USB pendrive (even 4 GB pendrive is OK)
- Install serial communication drivers
- Install sound related drivers/applications. I use madplay, because is frugal, i.e. consume few resources.
- Put in place the custom made application
- Test the result, using the web interface
- Note: All the needed software is provided in this blog
- The steps 1,2 and 4 are fully described in my youtube tutorial, but there are also other places on the internet to find it described.
Those steps are enough to have a cheap WiFi radio and, as a bonus, a WiFi signal extender.
- So, in order to install OpenWrt you need the image to be flashed. You may download one from here
- On your computer, in Terminal or Putty type: telnet 192.168.1.1. Will be appear to you the OpenWrt screen:
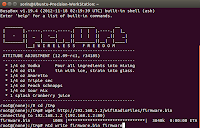 .
.Then type passwd and put a password. Type exit to close the telnet connection. Now you may be able to connect with your beloved router with SSH. On your PC terminal type ssh root@192.168.1.1 and lo and behold, you're connected via SSH.
- There are 3 files in OpenWrt that must be replaced or modified: /etc/config/network (do not forget to note the MAC Address prior to replace it), /etc/config/wireless and /etc/config/firewall.
- First of all you must prepare an USB pendisk by having on it 3 partitions: one EXT4 (1-2GB for the operating system), one FAT (for streaming radio station) and one Linux SWAP (approx: 100 MB). There are a bunch of tutorials on how to do that.
- Power off the router, put the USB pendrive in it, put also the USB sound card and power on the router(use the USB hub to connect all the stuff).
- On the router prompt type the following commands: opkg update, opkg install kmod-usb-storage, opkg install kmod-fs-ext4 block-mount, opkg install fdisk. Then type fdisk -l to see the EXT4 partition name. Could be sda1, or sda3.
- Now type: mkdir -p /mnt/sda1 or sda3 (see the previous command fdisk -l output.
mount /dev/sda1 /mnt/sda1, then type mkdir -p /tmp/cproot, mount --bind / /tmp/cproot
tar -C /tmp/cproot -cvf - . | tar -C /mnt/sda1 -xf -, umount /tmp/cproot, umount /mnt/sda1
Now edit the fstab file, as follows: vi /etc/config/fstab and modify it as is shown in the picture below:
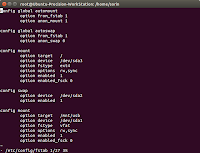
- Save and exit the fstab file (ESC wq) and type reboot in order to reboot your little router.
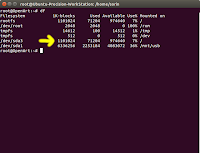
When the router is back to business log in with SSH and type df command. You must see something like that:
Incidentally you may encounter an error that contained the following: whole_root-disabled. If it happened, type: cp /.extroot.md5sum /tmp/whole_root-disabled/etc/extroot.md5sum.
- As you maybe seen from the last picture, I have also a partition named "USB". It is the FAT partition that I've made for the streaming files.
To make one, type: opkg update, opkg install kmod-fs-ext4 kmod-fs-vfat kmod-nls-cp437 kmod-nls-iso8859-1
mkdir -p /mnt/usb, mount -t vfat /dev/sda1 /mnt/usb. Basically I've created a folder in /mnt/usb where will be stored the streaming files.
- Few considerations about serial communication: We need the serial communication for connecting Arduino to USB.
From my experience, OpenWrt see an Arduino UNO as /ttyACM0 and Arduino Pro Mini, connected through FTDI BASIC outbreak board as /ttyUSB0.
Pay attention then, when you test your Arduino-router communication, to rename the commands you give accordingly (i.e. ttyACM0, or ttyUSB0).
- Now, there are three types of TTL to USB devices, FDTI BASIC outbreak board been one of them; another one is a cheap and bulky one based on PL2303 chip and the third one is a little more expensive, but smaller one, based on CP2102 chip.
You must verify of what type is yours, in order to know what applications must be installed on OpenWrt.
- Now, you need to type: opkg update, opkg install kmod-usb-acm needed when you test the application with your Arduino UNO
- opkg install kmod-usb-serial-ftdi
- opkg install kmod-usb-serial-pl2303
- opkg install kmod-usb-serial-cp210x
And now, depending your USB to serial breakout board (FTDI BASIC, PL2303 or CP2102), you'll install one of the following:
You may need even opkg install coreutils-stty.
It is helpful to change the baud rate, but I've noticed that ttyACM0 and ttyUSB0 are working on 9600 bps. Anyway, if you need to change the baud rate, just type: stty -F /dev/ttyACM0 9600 clocal cread cs8 -cstopb -parenb . The command is self explanatory.
-
Now, to test the communication between Arduino and router, link the two devices via USB cable, upload a simple sketch into Arduino and
catch the message on router side.
I've made a simple sketch based on SoftwareSerialExample
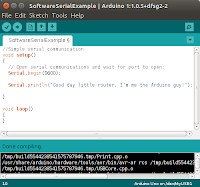
-
Now, on router type: cat /dev/ttyACM0 or cat /dev/ttyUSB0, depending on your board (Arduino UNO, or Pro Mini).
If the message appear, you're on track. Well done!
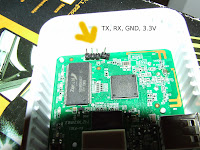
Remember, you need only one way communication through serial: from Arduino to MR3020 router, in order to transmit IR codes from remote control. NoteThere are also a serial connection on router main board; it is the UART connection ttyATH0. See the picture below. But in order to access that serial console you need to rebuild the flash image for OpenWrt. That's beyond the goal of my tutorial.

No comments:
Post a Comment